Problem Solving Strategies At Your Fingertips

For many students Maths is hard. There I said it – Maths can be hard. When I was in Primary School we were taught one way of solving tricky equations and that was just the way we had to do it. No questions asked. Even if it didn’t make sense.

Over the years the method of solving problems has changed. However, many Mums and Dads will understandably always revert to the trusty, tried and true ‘carry the tens place and then add down’. However this doesn’t always work.

Looking at this chart, it appears there is more than way to solve a problem!

For our students to be effective problem solvers, we need to teach them that there’s more than one way to solve a problem and to provide the strategies for them to do this. I wish my teachers had done this for me! It’s vital that we provide the tools to encourage students to be effective problem solvers.

I made this chart for my students to use as a reference. During the first two terms of the year, I specifically teach the different strategies that students can use to solve problems. We use this card to help us make conscious decisions of which strategy to use when, and what works best for us. This has given even my strugglers more confidence and independence in giving tricky Maths a go!

If you’d like your free copy of the reference card, please click on the picture below.

✏️❤️ Katie

DIY Flexible Seating

When I work, I sometimes sit at my desk and other times on the couch with my laptop (as I am right now 😄).

As educators, we know that academically all students work differently, and the same goes for how they feel comfortable in a classroom. I always have a comfy corner with a couch, another with beanbags, along with the option of desks. My students often ask if they can work on the floor. I’m ok with that – as long as they are on task.

Providing multiple options for seating isn’t just a fad. It’s common sense.

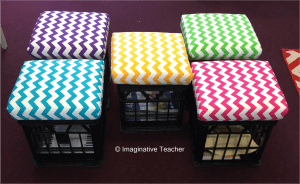
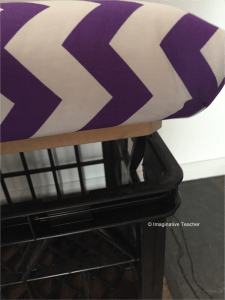
One thing that I made for my classroom is crate seats. Each one is made using MDF, wadding, another layer of cushioning and gorgeous fabric over the top. The best part is, not only are they fun and portable, but can also be used as additional storage if needed.

Here’s how I made them…..

You will need:

  • 1 piece of MDF cut larger than the crate opening
  • 1 piece of MDF slightly smaller than the crate opening
  • 1 piece of thick foam cut to the same size as the larger piece of MDF
  • 1 large piece of wadding
  • 1 extra larger piece of the fabric of your choice
  • 1 milk crate
  • staple gun
  • glue
  • screws
  • a spare pair of hands if available!

The MDF I purchased from Bunnings, while the foam came from Clark Rubber.
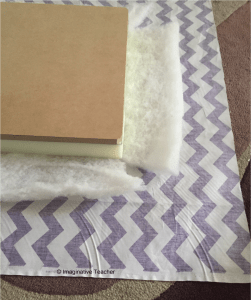
Step 1

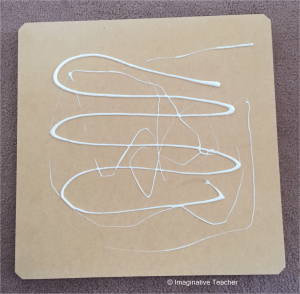
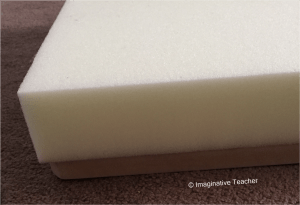
Cut a piece of MDF larger than the crate opening. This will the seat base. Cover it in glue and attach a piece of thick foam cut the same size to the board.

Step 2

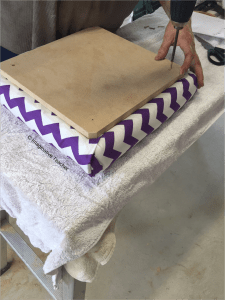
Lay your fabric of choice face down, a layer of wadding in the middle and the glued MDF/foam base on top. Cut notches in the wadding to reduce the bulkiness in the corners of the foam once it’s folded.
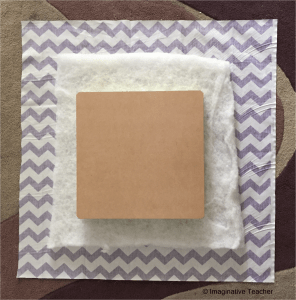
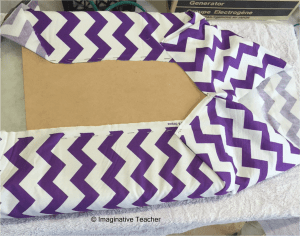
Step 3

Here’s where that extra pair of hands comes in handy! Fold up each side one at a time, and staple in place. Make sure you pull it tight before stapling (but not too tight!). Do opposite sides first  before rotating to staple the other two sides. Neatly folding sides 3 and 4 before stapling (as if I was wrapping a present), provided really neat corners.
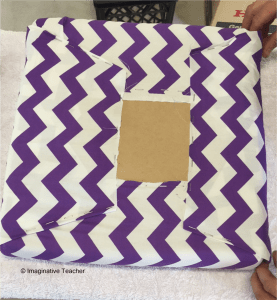
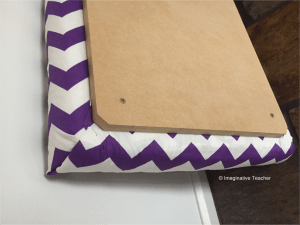
Step 4

Screw down the smaller piece of MDF into the middle of the seat. This not only holds the fabric in place, but also allows for a lip inside the crate so the lid doesn’t fall off (notice the corners cut on an angle to allow for a better fit).

Step 5

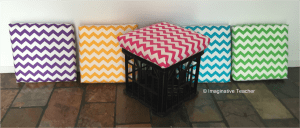
Repeat with different fabrics to make a variety of seats!

Here’s how I used them to store student’s filled workbooks which I needed to keep for report card writing time.

Milk crate seating

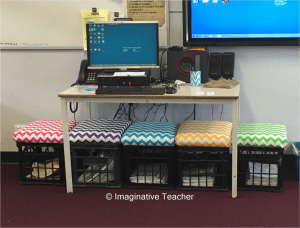
All up, each crate lid cost me about $20 each. It may seems steep but this is now the third year in a row I have used them successfully and they are wonderful not only for general class time, but also to grab and use at individual student conference time or listening to a student reading one on one.

If you make any, please do send me a pic! I’d love to see them!


✏️❤️ Katie


3D Printing for teachers

On my 40th birthday my lovely husband bought me a 3D printer. It was one of those gifts that I would have never thought of to buy myself but I LOVE it! It has now joined my Cricut obsession as one of my favourite fun time wasters creative tools.

As I have been teaching myself how to use TinkerCad online and the software that came with the printer, my mind keeps going back to the old teacher brain that can’t turn off thought of ‘what can I make that would be useful in class?’ The best part about 3D printing is that whatever I make can be used repeatedly and will stand the test of time. (If you’d like a copy of the 3D printing files I made so you can create your own, scroll to the bottom of the blog!).

The first ever thing I made were personalised keyrings for my kiddos bags for the first day back at school. They were a HUGE hit!

I’m a big user of hands on equipment and Math manipulatives in my classroom. Students need to make it, see it and experience it before they can record any new thinking.

The first thing I made was a set of ten frames. We use these in class a LOT! Flip tiles fit into the square spaces perfectly and are a wonderful tool when decomposing numbers. I have used them in multiple ways for making 10, 20 and subitising. They are one of those tools that I’ll use year after year again.


I also made the ten frames in a smaller size to use with those super cute mini Erasers from Kmart.

We’ve used them for partitioning 10 in 2 different parts

Partitioning 10 in 3 and 4 different parts

Incorporating other hands on equipment to show different ways of making 20


Continuing our unit of Number, I designed and created the hundreds chart cut outs. I’ve always used the cardboard versions but they get damaged so incredibly easily. My design uses both the numerical and word value, with two small stars located at the top to show students which way around it needs to be. The starting number is placed in the middle and students use the guides aroudn the edge to explore one more, one less, ten more and ten less to help familiarise themself with a hundreds chart.

My next creation – Pentominoes! I 3D printed each set of 12 in multiple colours so that I had a whole class set. They are a HUGE class favourite!!!

For storage I keep them all in one big, clearly labelled tub.


Want to 3D print some of these yourself? Get your copy of the .STL and .OBJ files by clicking on the images below.

Check out our Pinterest board for more fun ways to use the 3D printer in the classroom!

✏️❤️ Katie