Each year across Australia, The Children’s Book Council of Australia brings children and books together celebrating Children’s Book Week. During this time schools, libraries, booksellers, authors, illustrators and children celebrate Australian children’s literature.
Let me tell you – it’s a pretty big deal. Students love participating in all of the activities that school librarians organise, ranging from visiting authors providing workshops to theatre production incursions. A few years ago, I worked as the teacher in the library and I spent months preparing a variety of events for the 700 students at my school to participate in for the week.
Side note: This year I made a QR Code around the school scavenger hunt for my students to participate in – you can download it here for free! I actually made 3 different, smaller ones but have condensed it down to 1 larger, more generic hunt to match more school locations.
 Book Week celebrations always culminate in the most fun event of all – the whole school fancy dress parade. Now while students LOVE this day the most, a lot of teachers often groan (and so do many parents!) about having to organise costumes.
I’m of the mindset that it doesn’t have to be hard or take too much time to achieve a fun costume. After all, it’ll only be worn for a few hours, so why spend a fortune? Many parents will simply go to the local Kmart / Target / Toys R Us and purchase a fancy costume. I understand that people these days are time poor and I get it, I really do. For me, I enjoy being creative and this is why for the last few years I have been making my own costume. While I do know how to sew (I went to an all-girls high school where sewing classes were mandatory), there’s nothing better than a trusty glue gun and some safety pins!
I thought I’d share with you the costumes I have made and worn for the last three years to show you that it’s honestly really easy and can be done on a tight budget with minimal effort.
This is the basic costume template I used for costumes #1 and #3 (obviously not to scale). I cut out two and glue where shown.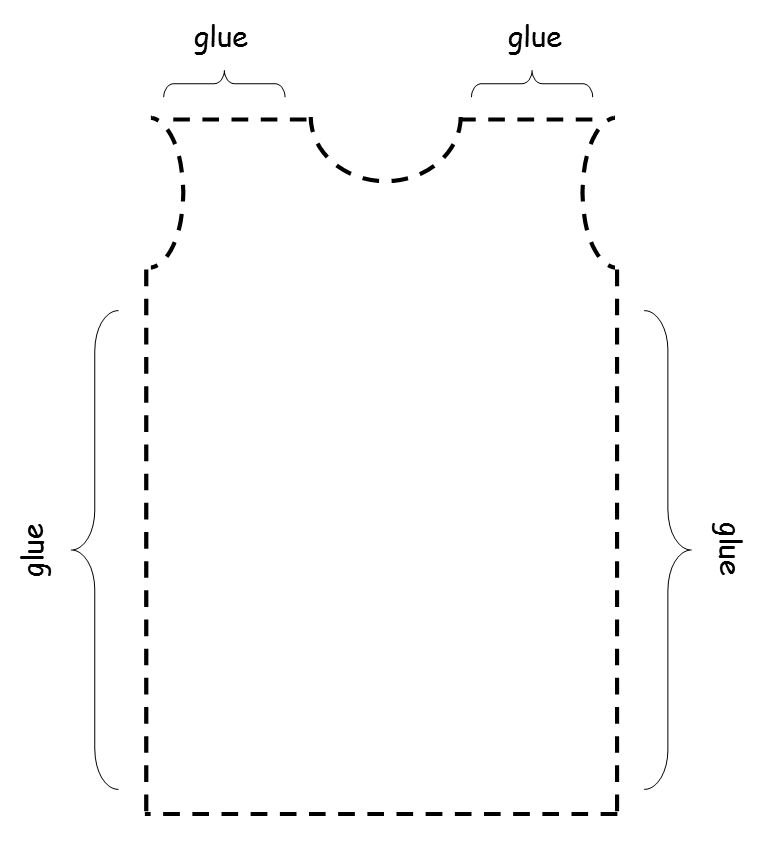 Here are my costumes from the last 3 years…..
Book – The Day the Crayons Quit
 Materials required:
- 2 metres of coloured felt
- 60cm of black felt
- One cardboard party hat
Starting with a basic template, I cut out 2 pieces of coloured felt for my body and hot glued them together where shown. I then cut out then block letters spelling ‘CRAYON’ from the left-over coloured felt.
Then, from the black felt, I cut out an elongated oval and two long rectangles. I hot glued the coloured block letters to the middle of the black oval and then glued the oval to the middle of the coloured base.
The rectangles I cut in half using a wavy line. When hot glued onto the coloured base at the top and bottom, I simply left a gap between them so the colour would show through.
For the crayon tip, I simply used another piece of left over coloured felt and glued it around a cardboard party hat.
Paired with black leggings and a black long sleeve top, my outfit was complete!
A few of my colleagues loved this idea so we all got together and made crayon outfits in various colours, created a few placards saying ‘I Quit!’ and walked around the costume parade together. It was a HUGE hit!
Book – The Rainbow Fish
Materials required:
- An old blue t-shirt
- A length of elastic long enough to be tied around my waist.
- 20cm each of various blue fabric
- 20cm of pink fabric
- 20cm of sparkly fabric
- 2 metres each of tulle in various ‘watery’ colours
T-shirt – fish scales
From the various blue and sparkly fabrics, cut out circles approximately 8cm in diameter. (I traced around the inside of a roll of sticky tape for size consistency). Hot glue these onto the t-shirt in a random, but overlapping fashion. Use mainly the coloured circles but occasionally insert a sparkly one. You won’t need to cover the whole t-shirt – simply a large section at the front.
Skirt – Fish tail
Loosely tie a piece of elastic around your waist at the position where you wish for your skirt to sit. Remove the elastic waistband.
Measure your tulle into strips of fabric twice the length of your desired skirt plus 5cm. For example, if you want your skirt to be 30cm long from the waist to the hemline, measure your tulle into strips 65cm long. Cut about 20 of these strips to start, and cut additional pieces later if you run out. For a fuller, fluffier skirt, cut many pieces of tulle into small, thin sections. To create a skirt that lies flat and not as fluffy, cut only a few pieces of tulle that are very wide.
Fold your tulle strips in half. As you begin to add your tulle to the skirt, fold each strip of tulle in half. This should create a loop on one end and two loose tails on the other.
Place the halved tulle strips over the waistband so that only a few inches of the loop stick out over the top. Then fold the tail ends around the waistband and pull them through the loop.
As you pull the strips through the loop, tighten them and slide them down the waistband to make room for other strips. Continue adding strips until you have filled up the waistband.
Again, wear black leggings underneath and you’re ready to go!
Book – The Very Hungry Caterpillar
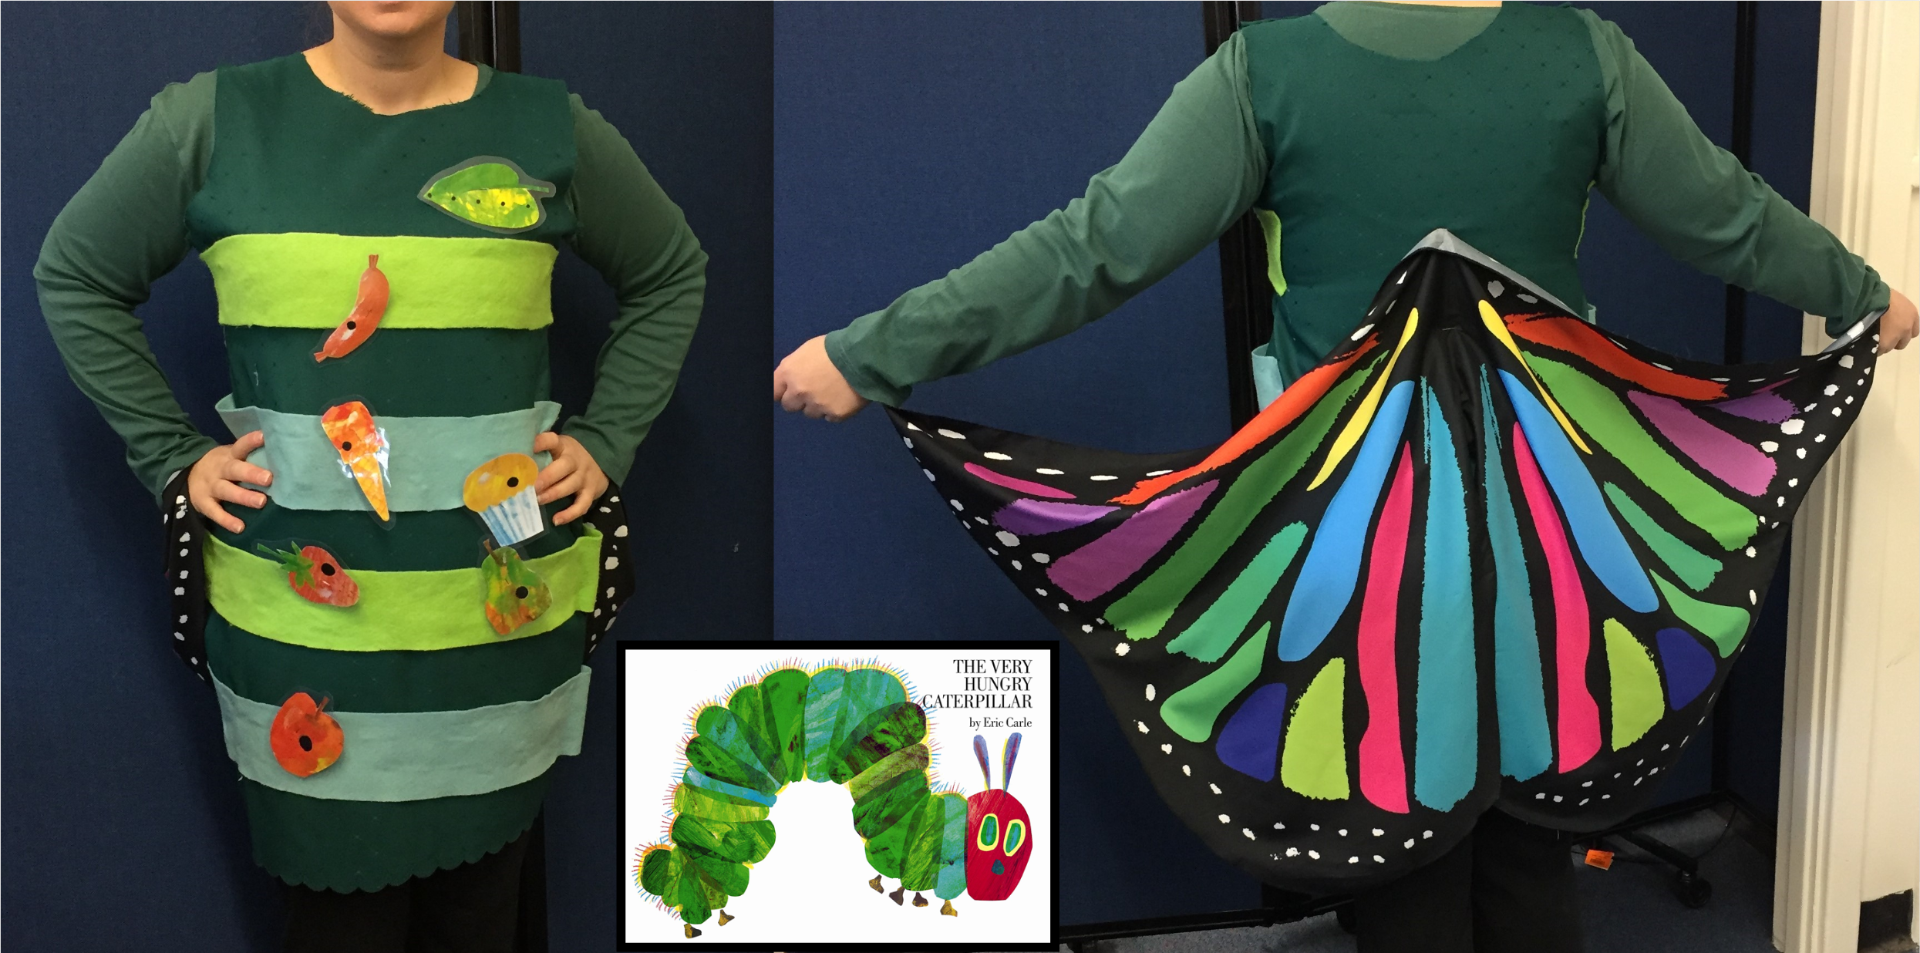
Materials required:
- An old tablecloth OR 2 metres of coloured felt
- 4 x 10cm wide strips of contrasting greenish felt
- Headband
- 2 green pipe cleaners (chenille sticks)
- Scanned and laminated food pictures from the book
- OPTIONAL – butterfly wings that I purchased from www.wish.com for $4
I cut 2 of the basic costume template from an old green tablecloth I already had in my cupboard. You could always purchase fabric, however I already had this one I no longer needed so I just used that. I then hot glued the sides as shown in the original template picture, then turned it right side out.
I then hot glued the 4 felt strips in alternating colours to the front, leaving spaces between each strip for the table cloth to show through.
I printed, laminated and cut out the scanned images from the book. These were safety pinned onto the front of my costume.
For the back, I safety pinned the set of wings I had purchased online.
Headband (not in picture) – wind two chenille sticks around a headband to create antennae.
Again, I wore my usual black leggings underneath, with a green long sleeve top to finish off the look.
I hope I’ve given you a few ideas on how you can make a costume. It genuinely doesn’t need to be fancy or time consuming. Just have fun and enjoy yourself!